Wednesday 27 August 2014

Week 4 Exercises (Operationalising the Dashboard and Horiz, Vertical & Diagonal p’type for alarm clock smartphone app)

Part 1


What are the functional components on the car here
a. shift/pedal gears just right beneath the steering wheel
b. wheel
c. meters
d. radio/mp3 player
e. GPS voiceover button (a call button on the steering wheel)
f. air cond temp and mode.
g. gears
h. handbrake
i. window buttons
j. side mirror buttons

What components are relevant to driving behaviour (when driving)?
- the steering wheel-driver needs to use it to control the direction of the car.

- the odometer and meters in front to allow the driver to drive safely within the speed limit or even know how much petrol is left.

- the gears/ shift pedals and also handbrake which lets the user control the speed of the car.

What functional component would you change?
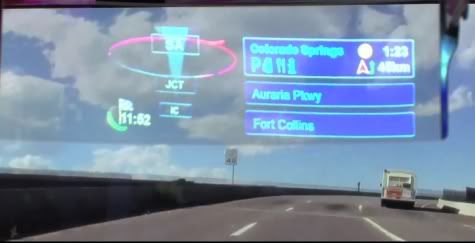
i would make the odometer/meter gauge an extra holographic version that floats on the screen in front. This would make it easier for the driver as he doesn't have to look away from the driveway to look at the meters. The holographic doesnt have to be too big as it would distract the user sight to drive. 

here's an example of a few cars with holographic meters.


Part 2:
Design & describe a horizontal, a vertical & a diagonal prototype for this application:
- Alarm clock application for your smartphone. 
- Can set, edit & delete multiple alarms 
- Can daisy-chain alarms - if one is allowed to ring out, another is activated automatically 
- Can set different tones for different alarms 
- Shake phone to snooze 

Horizontal Prototype:
The application features a big simple digital clock as the top part of the screen and followed by multiple alarms that could be created and saved into it. Beside each alarms are toggles which users could use it to switch between on and off for each of the multiple alarms. There should be no maximum amount of alarms that could be created and users can easily scroll down by swiping up to view more alarms that have been created. There is also a settings button right at the btm right of the app. This allows the user to go into settings to change many of the default settings such as snooze time, shake to snooze, language and others. User can also double tap any alarm to edit it's individual settings such as a specific tone for it, and also setting a daisy chain for it. 

Vertical Prototype:

From the horizontal prototype, users could double tap any alarm and go into this specific page. With this page, user could set specific tones for the alarm itself and also set a note. user can also choose another alarm to be activated if this alarm is turned off.

The page above here is the settings page. In this page, users could enable the shake to snooze and edit many other default settings such as default snooze time and also language of the application. 

Diagonal Prototype:

Scenario:
Aly is just about to go to bed and she is worried that she couldn't wake up the next day at 8am as she has a very important driving test to attend at 9am. She needs to use a good alarm clock/app.

What happens? 
Aly uses her smartphone and opens this particular alarm clock. Since she has to wake up at 8am, she sets an alarm at 8am. She goes into the settings page to toggle the shake to snooze so that the alarm would ring again just in case she's still awake.

Aly then creates another alarm at 8.20am and set another specific ringtone for this alarm. she goes back to the main page, and she double taps the 8am alarm and goes into it, and under the chain alarm section, she chooses the 8.20 alarm to be activated. This way, then Aly would definitely be alert when it's the 820 alarm because of the different tone of the alarm. Aly goes to bed peacefully knowing that the alarms would definitely wake her up the next day. 

Monday 18 August 2014

Filming and Video Editing

Hi, it's the weekend and I was in church and I thought I could film my friends playing the game! So I did! Here's a couple of shots of them testing out my game!


Image 1 and 2: Filming in Duhig

 Filming was fun and easy and now comes the tedious and hard part, the video editing! Here's a screenshot of me editing the video in Premiere pro. Have been learning of video editing skills like shortcuts and sequence trimming. Btw, I have never used premiere pro before, this is my first time. My only experience of using video editing programs are the Movie maker and Sony Vegas. So i had to go really slow and steady.

Screenshot 1: Editing the video on Premiere Pro.

Also, I have found a good corporate style song on Audio Jungle as my background music. 
click Here to listen to the music! (:

UPDATE: The video is up on youtube! (:


Saturday 16 August 2014

Video Prototype- LOGO and Illustrations

Logos and illustrations were done by Ai for prototype testing and filming!

So with illustrator, here's my logo of the game!! (:

figure 1: logo


For the prototype's purpose, I have created the board as well as the buttons so that I could test them and actually do filming as well!

figure 2: the board


figure 3: the mine


figure 4: blue buttons and mines for printing

figure 5: red buttons and mines for printing

so yeah! i have begun filming process! 

image 1: filming in my home.

Tuesday 12 August 2014

Video Prototype- The Idea and Concept!


So  this is my idea! it's a game mash up of two classic games, tic tac toe and minesweeper called
'This Means War'!

Figure 1: Game idea

From the screenshot above, it's seen that there are two 5x5 grids. The one of the left is hidden with 5 mines on it.

On the right, is the map of the actual game. Players will have it's own representatives and it will represent them in the game. So, to score a point, it takes 4 marks in a line, either diagonally, horizontally or vertically. And to win the game Players have to score 2 points. Yes, as easy as that, but then you have think about stepping on the mines as well! There will be 5 hidden mines in the board in every new game.

If a player steps on the mine with it's mark, then the mine will blow up and the mark is gone as well, now the 2nd player could choose to put his mark on the same place as now there is no more bombs there.

In the whole game, each user is given one chance to press the 'help' button to reveal one mine. when mines are revealed, they still act as the same, if user steps on it, it will go off as usual.

One big challenge that came up to me was to make the original tic tac toe more interactive. So rather than just simply taking up a pen and paper and playing the game, there is an actual physical layout where players could press them. This way, the game could be more intense and players would not just take it too lightly. With the crossover of the mines from minesweeper, players will now have to do more thinking than the original tic tac toe game, why? Simply because there will be mines and if u step on them, they will go off and you will lose your mark!


UPDATE: Redesigning and Iterating from the original idea

Because the game wasn't interactive enough, the game was made into a more physical game. There is an actual board now with buttons on it.

Figure 2: New Redesigned game

So from the image above here, the circles represent the buttons and R: red and B: blue.
So yeah, you get the picture here, When players press the buttons, the colour of the light on the button pressed will be lighted up. And mines will be yellow in colour.

If you have noticed, the newly designed map now is only a 4x4 grid, whereas the old ones were 5x5. This was because when the game is implemented, the Makey Makey has only 18 press-able buttons on it. But I'm not going to restrict myself from the Makey Makey, when we finally implement this game, if a 5x5 board will make the game better, I will make a 5x5!

Logos and the making of prototype soon to follow!

Peace,
Joel (:


Monday 11 August 2014

Week 2 Contact Exercise (Mixed/Augmented Reality Prototype)

Think about a device you have at home, smth you use regularly.
Something that I would use daily is the Qi wireless charger that i have for my Nokia Lumia 920. See pictures attached below if you've never seen wireless chargers before (: This device would always be on my main desk.


Think about your interaction with it.
I would use it as I reach home from uni/work or even whenever I'm home sitting on my desk. This would ensure the battery of my phone would always be full when I leave home!

Think about an aspect of the interaction that is open to variation
One thing that I'm always not happy with this product is that is always lying down horizontally and I can't immediately look at the phone whenever there's a notification. I have to at least pick it up. This would then stop the charging process of the phone thus lowering the charging rate of the phone. 


Design a mixed or augmented reality prototype to test those variations. 
Figure above shows are charger stand prototype that would be made out of cardboard (a sturdy but not thick material so that the charging process is not affected. 

With this charger stand, the interaction between the charger and the phone, and also the phone and I is increased greatly. As I am able to easily check my phone's status/notifications with just a glimpse. eg. I dont have to literally pick up the phone and check for notifications as now the phone is rested in an angle that is comfortable to my eyes. 


Here's a YouTube video of the prototype! do watch it! (:


Sunday 3 August 2014

Week 1 (What is a Prototype?)

What do YOU think a prototype is?
Prototype is a test product after a basic idea is formed.

What form does it take? 
Physical and Digital, basically any form that one can think of, from paper to body to visual graphics type.

What do you need to make one?
Just a small seed of an idea or concept. And some skills and common sense of course ;)

What is it used for?
Testing the idea, the validity of it and also receiving final feedback for FINAL OUTPUT PRODUCT.

What is it’s purpose? 
For most of the time, a prototype tells the community or users whether it would be a good or bad product. A prototype will determine whether the idea should be iterated and redesigned so that it could achieve the best possible final outcome.

When would you create one? 
Whenever I have an idea about a design, product or even project! Then every time after the prototype is tested, a new prototype covering the issues of the first original prototype should be created too. Until users or creators are really satisfies with the final outcome, then the prototype process is stopped and the final product is created!

Examples of some prototypes that are always created by big companies.


A digital prototype example (boombox radio tuner control)

~ Joel Tan


Welcome

Hi & Welcome to my blog! The name's Joel Tan. Am in my 2nd year of Bach. of Infs Tech in UQ and this blog will be all about the subject deco2300 (Digital Prototyping).